Detail
Product Type :
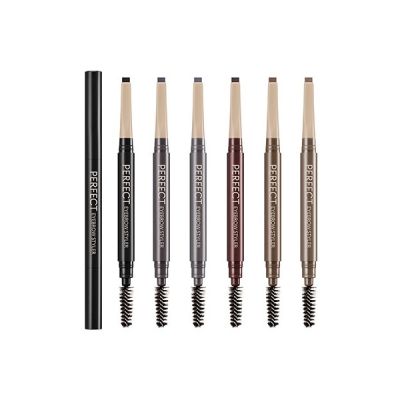
Pencil
Beauty - How to use
1. Twist up to reveal the desired amount of lead. Holding the styler at an angle, use only the tip of the triangle to shape brow and extend and taper brow tail with precision.
2. Holding the styler flat, use the entire width of the triangle to fill in brows using a gradient technique.
3. Use the spoolie brush on the other end to blend and groom brows into place.
Creating a youthful "straight-brow" look:
1. Using the bridge of your nose as a reference point, start the beginning of your brow (the head), in line with the side of the bridge of your nose.
2. Connect the brow head to the tail with a straight line drawn on a slight diagonal.
3. Fill in any sparse areas.
4. Using a brow gel (Missha Browcara), brush color on in the opposite direction of hair growth.
5. Lightly apply a second coat of brow gel (Missha Browcara), this time, in the direction of hair growth to groom and set brows in place.
6. Your "straight-brow" look is complete!
Creating a chic "arched-brow" look:
1. Using the bridge of your nose as a reference point, start the beginning of your brow (the head), in line with the side of the bridge of your nose.
2. Connect the brow head to the tail with a line drawn on a slight diagonal that curves towards the tail.
3. Continue shaping the brow, as desired.
4. Fill in any sparse areas.
5. Using a brow gel (Missha Browcara), brush color on in the opposite direction of hair growth.
6. Lightly apply a second coat of brow gel (Missha Browcara), this time, in the direction of hair growth to groom and set brows in place.
7. You "arched-brow" look is complete!
72-Hour Holiday Deals
SK-II - Facial Treatment Essence (Pitera Essence)
Was
€172.78
Price
€118.99
Kose - Softymo - White Cleansing Oil (Yellow) - 230ml
Was
€14.65
Price
€12.99

Romand - Better Than Palette - 7.5g
Was
€21.58
Price
€16.39
ETUDE - Mask Proof Fixing Tint - 4g
Was
€13.36
Price
€6.49
Shiseido - Tsubaki Hair Milk - 100ml
Was
€22.19
Price
€18.49
Barr - Centella Calming Gel Essence - 60ml
Was
€18.23
Price
€14.09
miseenscéne - Perfect Styling Serum - 80ml
Was
€11.79
Price
€9.43
Barr - Centella Soothing Sun Essence SPF 50+ PA++++ - 50ml
Was
€20.99
Price
€17.49
Unleashia - Pretty Easy Glitter Stick - 0.7g
Was
€12.15
Price
€6.39
Healing Bird - No Wash Ampoule Treatment - 200ml
Was
€22.42
Price
€17.50
Mary&May - Houttuynia Cordata+Tea Tree Cleansing Foam - 150ml
Was
€12.05
Price
€10.29
Amuse - Dew Tint - 4g
Was
€20.55
Price
€12.79
Pyunkang Yul - Low pH Pore Deep Cleansing Foam
Was
€9.49
Price
€7.59
MISSHA - Magic Cushion Moist Up - 15g
Was
€10.49
Price
€8.39
COSRX - Pure Fit Cica Cleanser - 50ml
Was
€8.09
Price
€7.09
Medi Flower - Aronyx Hyaluronic Acid Collagen Eye Patch - 60pc
Was
€11.62
Price
€9.29
COSRX - Pure Fit Cica Creamy Foam Cleanser - 150ml
Was
€14.75
Price
€12.29
Romand - Glasting Water Tint - 4g
Was
€9.34
Price
€8.29
Rohto Mentholatum - Hada Labo - Gokujyun Hyaluronic Acid Lotion Refill - 170ml
Was
€14.38
Price
€11.69
A'PIEU - Juicy-Pang Jelly Blusher - 4.8g
Was
€8.12
Price
€6.19
Purito SEOUL - Cica Clearing BB Cream - 30ml
Was
€11.21
Price
€9.99
Rohto Mentholatum - Hada Labo Gokujyun Hyaluronic Acid Cream (Japan Version) - 50g
Was
€18.28
Price
€16.09
peripera - Ink The Velvet - 4g
Was
€9.25
Price
€7.09
MISSHA - Chogongjin Geumsul Jin Cream - 60ml
Was
€30.47
Price
€26.69
B_LAB - Cica Barrier 5.5 Cleansing Oil Balm - 100ml
Was
€9.37
Price
€7.49
SCINIC - Enjoy Super Mild Sun Essence SPF50+ PA++++ - 50ml
Was
€14.01
Price
€9.49
CANMAKE - Mermaid Skin Gel UV SPF 50+ PA++++ - 40g - 01 Clear
Was
€11.18
Price
€10.89
Dr. Jart+ -Soothing Hydra Solution Mask
Was
€12.83
Price
€10.69
MISSHA - Time Revolution The First Essence 5X - 30ml
Was
€4.37
Price
€3.49
Holika Holika - Jelly Dough Blusher - 4.2g
Was
€10.74
Price
€6.59
Rohto Mentholatum - Hada Labo Gokujyun Super Hyaluronic Face Foam (Japan Version) - 160ml
Was
€13.41
Price
€12.69
Description
Smooth drawing, Natural color. Long lasting auto type eyebrow pencil.
Detail
Product Type :
Pencil

ABOUT US
Your one stop online shop to purchase the trendiest Asian fashion and beauty products
Discover a style that represents the beautiful you
FREE SHIPPING
Free Standard Shipping on orders over 49€
Delivery within 10 - 14 business days after order dispatch
PAYMENT METHODS
Accepts Paypal, Visa & Mastercard (via PayPal)

CONTACT US
Email: support_eu@stylevana.com